Sunday, April 2, 2023

Creation of CCR Day 4

Over the last two days, I've been editing and finishing my two CCRs. I have actually managed to finish. The project is finally done. After 8 weeks of work, it's all done. I've made the director's commentary and presentation through Premiere Pro. 

I first worked on the presentation. I took snippets of each slide from my PowerPoint presentation and then put it into the Premiere Pro interface. Afterwards, I used the microphone tool to input my audio to have the voiceover in the presentation. I repeated this process for each slide. Down below you can see the microphone tool that I used.

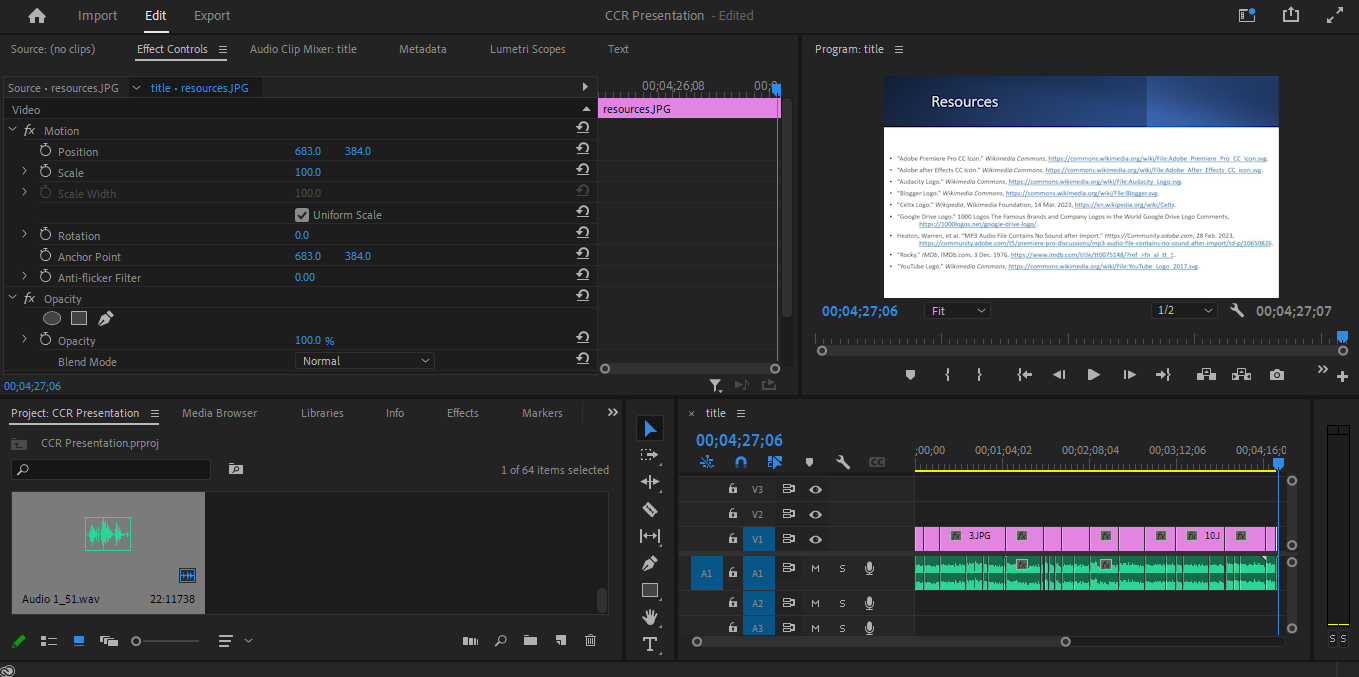
After a while of recording audio, I finished the presentation. I also had to change the resources from just links to the MLA format. I asked my teacher and she said that Cambridge uses the MLA format. I thought MLA was easier to do so I just put it into MLA. Here's what the final presentation looked like in Premiere Pro. It was 4 minutes and 27 seconds long.
Then, I worked on editing my director's commentary together. This took much longer than the presentation because I had to use specific clips of my film opening to match with what I was talking about. I recorded all my audio first using the microphone tool and then added all the video portion of the director's commentary. After a lot of editing together, I finished this part of the project too. I also included some more research into this director's commentary when talking about the target audience, and I included some images from other movies to give a visual of what I was talking about. Although this isn't a convention of a director's commentary, it gives more details because it actually shows what I'm talking about. I had to reuse some clips to show what I was talking about in some segments, and in the end, there wasn't really anything that could relate to the things I was talking to like in the distribution of the film, so I just put the biking sequence because that's the most engaging part of the film. The director's commentary ended up being 4 minutes and 25 seconds long. Here's what my director's commentary looked like.

After finishing the director's commentary, I tried to render it so I could export the video. After trying to render it, most of it was rendered, but some of it was not rendered and an error message popped up.

I didn't know what was going on. I tried to research this error message, but I couldn't find anything useful. Then, I remembered something my brother said. He said something along the lines of "Bro, you have way too much footage on your computer. How do you even run anything?" So, I went to check my storage settings. To my surprise, I had absolutely no storage left on my computer. 

After restarting my computer, I deleted 10 GB of files from my computer, and started the rendering again. I finished rendering and was able to export the video. Now, everything is finally finished.

After so long, I can finally say. Yeah, I did it. You'll have to look at my next blog posts to see the finished products. Well, until next time. See ya!

Wednesday, March 29, 2023

Creation of CCR Day 3

Today, I wanted to complete the PowerPoint presentation for the 2nd CCR. First, I need to put the information in a summarized form into the slides. I need to make them short and sweet so I can let my voice do the talking instead of the words on the slides. Then, I will be able to input images into the slides that match with the information of what I will be saying. 

I will be answering the two questions "How did your production skills develop throughout this project?" and "How did you integrate technologies in this project?" These questions don't necessarily need research to be done because all of the information comes from my own brain because my experiences are my own resource. 

Today's blog will most likely be a bit shorter then usual because there really isn't much to say. I just created the PowerPoint by transferring the information from my script into the slides. I also took many images from my documentation to show the types of equipment I used. I used some images from the internet to show the different software that I used. This is the only thing that I will be referencing in my resources page at the end of the presentation. It isn't very necessary, but I want to give credit for the images.

Here's an example of one of my slides. I tried to keep each slide simple with all the information on it, and I tried to make it visually pleasing with the images and the color scheme. I went for a blue color scheme because the main character of the plot, otherwise known as myself, was wearing blue as the cross country hoodie. I also used blue because it's just an objectively good color (don't ask me, ask literally the majority of mankind).


Here's another one of my slides (I'm talking about the one above). This slide follows the same color scheme with the blue. This slide has the most personal information as you'll see all the major problems that I dealt with during this project that had to deal with technology. Sometimes using new software can be hard, and that's what I will be talking about during this slide. You can see that I kept the bullets pretty short, and a large portion of the slide is images.

I don't want to spoil too much of the presentation. You'll see it when I'm done, which will be in around 4 days. I'll get back to you to talk about the actual editing together of the director's commentary and the presentation. Well, until next time. See ya!

Tuesday, March 28, 2023

Creation of CCR Day 2

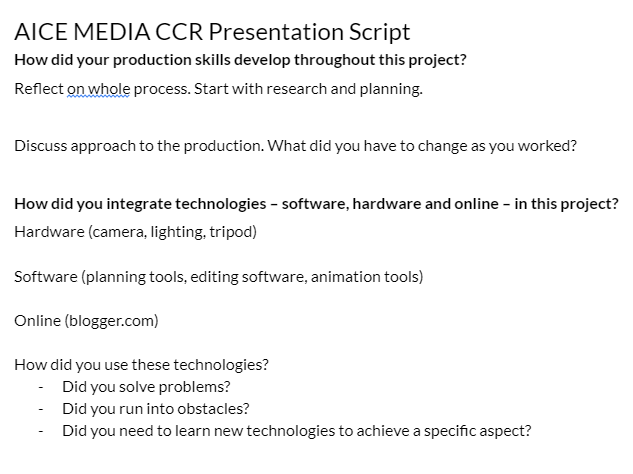
Today I wanted to create the script and the basic outline of the PowerPoint for the second two questions of my CCR. My teacher had already told us (the class) what to write about, so I made an outline for what points I needed to hit. I created a Google doc for this outline and here's what it looked like.

Then, I edited the outline to make a template for each slide. I divided up each topic into multiple slides. I could also have some other slides that include some videos or pictures. Then, I got straight to work on answering the questions.

After around 1000 words, I finished the script for my presentation CCR. It's right under here if you want to take a look.

This presentation may be a bit too long just like the director's commentary, so I will have to shorten both of these.

I also worked on the actual presentation itself, but I didn't do too much work on it. I just created the outline with all the titles for each slide. Nothing too important and not important enough to show any images of it. It's a total of 12 pages. I'm not sure if I should add any references yet because the questions I answered in this CCR were how my production skills developed and what technologies I integrated. No one can tell me how I improved other than myself, and I have the knowledge of what technologies I integrated. So, I don't think I will need a references page, unless I include some images, YouTube videos, or research in the presentation. 

Throughout the week, I will finish both CCRs. I'll get back to you as soon as I'm done. I'll try to finish on Saturday so I can make some final blog posts. I can't believe this journey is almost over. Well, until next time. See ya!

Monday, March 27, 2023

Creation of CCR Day 1

Today, I wanted to work on and finish the script for one of my CCRs. For the CCRs I have to do two different mediums to answer four different questions. I wanted to do a director's commentary for the first two questions and a recorded presentation for the other two questions. So, I started creating the script for the first two questions with the director's commentary. In the director's commentary I will be going through the film opening answering the two questions using examples from the film. 

First, I will introduce myself and then summarize the film in a short sentence. Then, I will explain all of the questions in chronological order of the film since that's what director's commentaries usually do. I searched on YouTube to find an example of a director's commentary, and I found a director commentary on Jordan Peele's Get Out. 

I used this as an example for my director's commentary. I noticed one thing though. He only used snippets from his movie and not video clips. In some parts, I wanted to use video clips. Here's what I've done for my script:


This script is around 1200 words. That might be too much to say in around 5 minutes, and I still have to do another part of the CCR. This means I might have to shorten the script a little. I think this is enough work for today. I just came back from my cruise vacation (it was really fun). Well, until next time. See ya!

Resources

Friday, March 24, 2023

Day 2 of Editing

Today, I wanted to complete my video. This meant that I had a lot of work to do to finish today. I have to add more audio, add the title screen, add the shot of me in the "hospital" with the scribbled eyes effect, add a ringtone, add some more clips to make the mountain biking sequence complete, fix audio in some parts, add a heart rate monitor sound, fix the overexposure in some clips, add the credits, and just clean everything up.

First of all, I started out by looking for audio. The audio I needed today was a phone ringtone and a heart rate monitor sound. I wanted to use copyright free sound effects because I can't make a ringtone with Foley, and it would be really hard to make a heart rate monitor with Foley. All of the other sound in my video is original though, excluding the song I chose. I searched on YouTube for copyright free or royalty free sound effects, and I found one for each of the sounds I needed.


With these sound effects, I could input them into the video, but MAKE THEM .WAV before putting them into Premiere Pro. See, I learned my lesson. The sound effects didn't give me any problems. I will still have to sync up the sound effects with the video later, but for now, I just put it into the video in the spot where it is okay. It will be better.

Next is the title. I had asked a couple of my friends on their opinions between the two fonts that I had selected in my research blog for title fonts (Link Here), and I chose the font called "Reisenberg 2.0 Regular". This font was a lot bolder and would create more impact right after the crash happens. 

I downloaded the font file, and I looked into the terms and agreements, and it said that I couldn't change the font in any way if I didn't want to buy the file. Therefore, I could not carry out my idea of changing the C into a track. Anyways, I think it would look better like this, so it's ok. I put the title into its place, and I moved onto the next thing I had to do today.

Next, I had to put the edited file of me in the "hospital" with the scribbled eyes into the film. This was very simple because all I had to do was drag and drop the file into its place.

Then, I looked through the entire project multiple times to see whether the pitches and the volume of all the audio clips were right. I wanted to make sure that you could hear all of the dialogue, but still have the music in the background. I also added more audio of the bike sound effect, but all of the sound effects of the bike were mine. This helped make each scene much more deep and complete. 

As I was watching my film again, I noticed that some of the shots in my room were overexposed as the window in my room showed too much light. This was something that my teacher warned me about. Aw man. I really tried to get the exposure right. Oh well. Time to try to fix it. I researched how to reduce overexposure of videos on Premiere Pro, and I found a video on YouTube explaining how to do it step-by-step.

I watched the video and followed the steps according to what the man said. I went to the Lumetri Color and Lumetri Scopes panel in the Premiere Pro window, and I had to change a lot of things. First, I did some basic color correction by changing the light levels of the highlights, shadows, whites, and blacks.

After this, I went under the Curves tab and changed the Lumetri Color curve. This changed the lights and the darks of the footage to be less intense.

After doing all this, it was still a bit noticeable that it was overexposed, but it was still a little bit better. At least I'm learning more about Premiere Pro and it's functions. Here you can see the difference between the original (left image) and the edited (right image):

Then, I had to create the credits for the video. I think I want to either choose a simple white or black font to do these credits, just like the film examples that I have researched. I need to include the producer, director, writer, cinematographers, editor, and major actors. I wanted to edit it in a new way, so I could learn some new techniques. I remembered a technique that I've seen in many different videos. One where the text appears as something goes across the screen. I looked on YouTube if I could find anything that informed me on how to do this. I found a video explaining exactly what I wanted.

Using this, I was able to make a cool effect in the video that showed one of the credits as I was walking across the screen. I thought this was really cool, and it was probably one of my favorite additions to the video.

Finally, I fixed the sound by syncing it to the video, made some final touches to the video to sync it up to the song, and finalizing the sound levels of all the audio.  Here's what the Premiere Pro file looked like:

The final video is 2 minutes, 1 second, and 55 frames, which is very close to the 2 minute mark. Usually, shots edited in After Effects would appear as red in the image, so why isn't anything red in my file? This is because I created a different file to edit the scribbled eyes scene and the exported it to my real project file. You may ask: what are the pink shots? The pink shots are the credits and the title. I took the font file, made my title, and turned it into a .jpg. I think they're pink because they're not video files, but image files.

I think I did a really good job, and it's been a long way to get to this point. In the beginning, I didn't know where I wanted to go, and I was unsure if I could finish in time, but it looks like I'm doing great. I can't show you my video yet. You'll have to wait. Until next time. See ya!

Resources

Wednesday, March 22, 2023

Editing Audio

Time to edit my audio to make it sound like a phone's audio. I opened Audacity and the tutorials that I researched last blog, and I started to upload my files to Audacity.

But of course, sound files and file types just can't go well together like the last time when I tried to upload the .mp3 into the file opening. This time, the file type of the audio Sean sent me was a .m4a and apparently this file type isn't accepted in Audacity, and I have to change it to a WAV file. Why am I not surprised? All of the sound files just have to have obstacles that I have to overcome or just minor annoyances like this. This is the error popup that I got when trying to import my audio files to Audacity.


Oh well. Time to go back to my old friend, an online file converter. Here's the website that I used to convert the files from .m4a to .wav: https://cloudconvert.com/m4a-to-wav.

With my files' format changed, I could begin the process of changing all my sound files. I opened up my first WAV file in Audacity. I went to the effects panel and then went to the Graphic EQ panel. This is where all of the frequencies and pitches could be manipulated to make different sounding audio clips. I followed the tutorial to make the lower and higher frequencies lower in volume, with the middle frequencies having higher frequency.

This really made the audio sound like it was from a phone call. I was surprised by just how different the audio was. After editing the audio, it was a bit quiet, so I went to amplify the sound. I went to the effects panel and opened the Amplify panel. This is where I could make all the audio clips the same volume. I could also adjust the audio to make it louder for the clips.

After this, I could repeat the process for the other two files that Sean sent me, since there were a total of three files.

Here is an example of how different the audios sound. One of these files are the original file that Sean sent me. The other file is the phone call audio. Try to guess which one is which. 


With the audio edited, I could now complete the film opening. I have to add the clip of the rotoscoped hospital scene, this audio, and fill in some holes in the film opening. There isn't much work left to do. I'm almost done now. Well, until next time. See ya!

Tuesday, March 21, 2023

Researching How to Make Phone Audio and Audacity

I just got the audio from my friend Sean for the phone call section. His audio was extremely clear, and I could hear every little treble and syllable very clearly in his audio. This would be great if I was just doing a voiceover of someone. The problem is that I have to make it sound like a phone call. The audio isn't very good from a phone, so I wanted to have him record clear audio so then I could edit it in a audio software and then put it into my film, so it would sound like a realistic phone call. 

I wish audio files were supported by the blogger input feature. I wanted to show you guys how clear this audio is. Let me search up how to do it. I went to the mother of all tech tutorials, YouTube (of course), and searched up how to upload an audio file into Blogger. I found a YouTube video that used the HTML feature of Blogger. I thought this was really interesting as I also like techy stuff, and I like code. I wanted to try this out. 


So basically, all I have to do to input the audio file into Blogger is to use some HTML code, which is like website code, to import the file from my Google Drive to the Blogger interface. This turned out to be really easy to do. Here's the one of the clear audio files that I got from Sean.

Now that I have my files, I can try to turn it into a phone call sounding audio. I searched up some YouTube tutorials and found this one about Audacity, an audio editing software. I have used Audacity before in one of my classes in school, specifically AICE Information Technology, but I haven't used it for really making effects to the audio before. Here's the video I found.

In the video, it changes the volume of certain frequencies, lowering the extreme ends of the frequency and increasing the middle frequencies. This looks a bit complicated, but I think it yields the best results for a phone call audio. 

Another video that I found had an extremely simple solution to the telephone effect because it literally had a preset effect to make audio sound like its from a telephone. 

It simply went to the effects panel, clicked equalize, and then finally pressed telephone as the selected curve for the audio. This seems a lot simpler, but it would be a lot less effective at making the phone quality audio. I think I might be able to use both audios tutorials to make a really good sounding audio clip. 

I will use Audacity to change the audio, but I think that's it for today. Well, until next time. See ya!

Resources

Creative Critical Reflection

Well guys. This is it. This is the end of the road: my CCRs. I really would like to thank you for taking the time to read all of these blogs...