Wednesday, March 29, 2023

Creation of CCR Day 3

Today, I wanted to complete the PowerPoint presentation for the 2nd CCR. First, I need to put the information in a summarized form into the slides. I need to make them short and sweet so I can let my voice do the talking instead of the words on the slides. Then, I will be able to input images into the slides that match with the information of what I will be saying. 

I will be answering the two questions "How did your production skills develop throughout this project?" and "How did you integrate technologies in this project?" These questions don't necessarily need research to be done because all of the information comes from my own brain because my experiences are my own resource. 

Today's blog will most likely be a bit shorter then usual because there really isn't much to say. I just created the PowerPoint by transferring the information from my script into the slides. I also took many images from my documentation to show the types of equipment I used. I used some images from the internet to show the different software that I used. This is the only thing that I will be referencing in my resources page at the end of the presentation. It isn't very necessary, but I want to give credit for the images.

Here's an example of one of my slides. I tried to keep each slide simple with all the information on it, and I tried to make it visually pleasing with the images and the color scheme. I went for a blue color scheme because the main character of the plot, otherwise known as myself, was wearing blue as the cross country hoodie. I also used blue because it's just an objectively good color (don't ask me, ask literally the majority of mankind).


Here's another one of my slides (I'm talking about the one above). This slide follows the same color scheme with the blue. This slide has the most personal information as you'll see all the major problems that I dealt with during this project that had to deal with technology. Sometimes using new software can be hard, and that's what I will be talking about during this slide. You can see that I kept the bullets pretty short, and a large portion of the slide is images.

I don't want to spoil too much of the presentation. You'll see it when I'm done, which will be in around 4 days. I'll get back to you to talk about the actual editing together of the director's commentary and the presentation. Well, until next time. See ya!

Tuesday, March 28, 2023

Creation of CCR Day 2

Today I wanted to create the script and the basic outline of the PowerPoint for the second two questions of my CCR. My teacher had already told us (the class) what to write about, so I made an outline for what points I needed to hit. I created a Google doc for this outline and here's what it looked like.

Then, I edited the outline to make a template for each slide. I divided up each topic into multiple slides. I could also have some other slides that include some videos or pictures. Then, I got straight to work on answering the questions.

After around 1000 words, I finished the script for my presentation CCR. It's right under here if you want to take a look.

This presentation may be a bit too long just like the director's commentary, so I will have to shorten both of these.

I also worked on the actual presentation itself, but I didn't do too much work on it. I just created the outline with all the titles for each slide. Nothing too important and not important enough to show any images of it. It's a total of 12 pages. I'm not sure if I should add any references yet because the questions I answered in this CCR were how my production skills developed and what technologies I integrated. No one can tell me how I improved other than myself, and I have the knowledge of what technologies I integrated. So, I don't think I will need a references page, unless I include some images, YouTube videos, or research in the presentation. 

Throughout the week, I will finish both CCRs. I'll get back to you as soon as I'm done. I'll try to finish on Saturday so I can make some final blog posts. I can't believe this journey is almost over. Well, until next time. See ya!

Monday, March 27, 2023

Creation of CCR Day 1

Today, I wanted to work on and finish the script for one of my CCRs. For the CCRs I have to do two different mediums to answer four different questions. I wanted to do a director's commentary for the first two questions and a recorded presentation for the other two questions. So, I started creating the script for the first two questions with the director's commentary. In the director's commentary I will be going through the film opening answering the two questions using examples from the film. 

First, I will introduce myself and then summarize the film in a short sentence. Then, I will explain all of the questions in chronological order of the film since that's what director's commentaries usually do. I searched on YouTube to find an example of a director's commentary, and I found a director commentary on Jordan Peele's Get Out

I used this as an example for my director's commentary. I noticed one thing though. He only used snippets from his movie and not video clips. In some parts, I wanted to use video clips. Here's what I've done for my script:


This script is around 1200 words. That might be too much to say in around 5 minutes, and I still have to do another part of the CCR. This means I might have to shorten the script a little. I think this is enough work for today. I just came back from my cruise vacation (it was really fun). Well, until next time. See ya!

Resources

Friday, March 24, 2023

Day 2 of Editing

Today, I wanted to complete my video. This meant that I had a lot of work to do to finish today. I have to add more audio, add the title screen, add the shot of me in the "hospital" with the scribbled eyes effect, add a ringtone, add some more clips to make the mountain biking sequence complete, fix audio in some parts, add a heart rate monitor sound, fix the overexposure in some clips, add the credits, and just clean everything up.

First of all, I started out by looking for audio. The audio I needed today was a phone ringtone and a heart rate monitor sound. I wanted to use copyright free sound effects because I can't make a ringtone with Foley, and it would be really hard to make a heart rate monitor with Foley. All of the other sound in my video is original though, excluding the song I chose. I searched on YouTube for copyright free or royalty free sound effects, and I found one for each of the sounds I needed.


With these sound effects, I could input them into the video, but MAKE THEM .WAV before putting them into Premiere Pro. See, I learned my lesson. The sound effects didn't give me any problems. I will still have to sync up the sound effects with the video later, but for now, I just put it into the video in the spot where it is okay. It will be better.

Next is the title. I had asked a couple of my friends on their opinions between the two fonts that I had selected in my research blog for title fonts (Link Here), and I chose the font called "Reisenberg 2.0 Regular". This font was a lot bolder and would create more impact right after the crash happens. 

I downloaded the font file, and I looked into the terms and agreements, and it said that I couldn't change the font in any way if I didn't want to buy the file. Therefore, I could not carry out my idea of changing the C into a track. Anyways, I think it would look better like this, so it's ok. I put the title into its place, and I moved onto the next thing I had to do today.

Next, I had to put the edited file of me in the "hospital" with the scribbled eyes into the film. This was very simple because all I had to do was drag and drop the file into its place.

Then, I looked through the entire project multiple times to see whether the pitches and the volume of all the audio clips were right. I wanted to make sure that you could hear all of the dialogue, but still have the music in the background. I also added more audio of the bike sound effect, but all of the sound effects of the bike were mine. This helped make each scene much more deep and complete. 

As I was watching my film again, I noticed that some of the shots in my room were overexposed as the window in my room showed too much light. This was something that my teacher warned me about. Aw man. I really tried to get the exposure right. Oh well. Time to try to fix it. I researched how to reduce overexposure of videos on Premiere Pro, and I found a video on YouTube explaining how to do it step-by-step.

I watched the video and followed the steps according to what the man said. I went to the Lumetri Color and Lumetri Scopes panel in the Premiere Pro window, and I had to change a lot of things. First, I did some basic color correction by changing the light levels of the highlights, shadows, whites, and blacks.

After this, I went under the Curves tab and changed the Lumetri Color curve. This changed the lights and the darks of the footage to be less intense.

After doing all this, it was still a bit noticeable that it was overexposed, but it was still a little bit better. At least I'm learning more about Premiere Pro and it's functions. Here you can see the difference between the original (left image) and the edited (right image):

Then, I had to create the credits for the video. I think I want to either choose a simple white or black font to do these credits, just like the film examples that I have researched. I need to include the producer, director, writer, cinematographers, editor, and major actors. I wanted to edit it in a new way, so I could learn some new techniques. I remembered a technique that I've seen in many different videos. One where the text appears as something goes across the screen. I looked on YouTube if I could find anything that informed me on how to do this. I found a video explaining exactly what I wanted.

Using this, I was able to make a cool effect in the video that showed one of the credits as I was walking across the screen. I thought this was really cool, and it was probably one of my favorite additions to the video.

Finally, I fixed the sound by syncing it to the video, made some final touches to the video to sync it up to the song, and finalizing the sound levels of all the audio.  Here's what the Premiere Pro file looked like:

The final video is 2 minutes, 1 second, and 55 frames, which is very close to the 2 minute mark. Usually, shots edited in After Effects would appear as red in the image, so why isn't anything red in my file? This is because I created a different file to edit the scribbled eyes scene and the exported it to my real project file. You may ask: what are the pink shots? The pink shots are the credits and the title. I took the font file, made my title, and turned it into a .jpg. I think they're pink because they're not video files, but image files.

I think I did a really good job, and it's been a long way to get to this point. In the beginning, I didn't know where I wanted to go, and I was unsure if I could finish in time, but it looks like I'm doing great. I can't show you my video yet. You'll have to wait. Until next time. See ya!

Resources

Wednesday, March 22, 2023

Editing Audio

Time to edit my audio to make it sound like a phone's audio. I opened Audacity and the tutorials that I researched last blog, and I started to upload my files to Audacity.

But of course, sound files and file types just can't go well together like the last time when I tried to upload the .mp3 into the file opening. This time, the file type of the audio Sean sent me was a .m4a and apparently this file type isn't accepted in Audacity, and I have to change it to a WAV file. Why am I not surprised? All of the sound files just have to have obstacles that I have to overcome or just minor annoyances like this. This is the error popup that I got when trying to import my audio files to Audacity.


Oh well. Time to go back to my old friend, an online file converter. Here's the website that I used to convert the files from .m4a to .wav: https://cloudconvert.com/m4a-to-wav.

With my files' format changed, I could begin the process of changing all my sound files. I opened up my first WAV file in Audacity. I went to the effects panel and then went to the Graphic EQ panel. This is where all of the frequencies and pitches could be manipulated to make different sounding audio clips. I followed the tutorial to make the lower and higher frequencies lower in volume, with the middle frequencies having higher frequency.

This really made the audio sound like it was from a phone call. I was surprised by just how different the audio was. After editing the audio, it was a bit quiet, so I went to amplify the sound. I went to the effects panel and opened the Amplify panel. This is where I could make all the audio clips the same volume. I could also adjust the audio to make it louder for the clips.

After this, I could repeat the process for the other two files that Sean sent me, since there were a total of three files.

Here is an example of how different the audios sound. One of these files are the original file that Sean sent me. The other file is the phone call audio. Try to guess which one is which. 


With the audio edited, I could now complete the film opening. I have to add the clip of the rotoscoped hospital scene, this audio, and fill in some holes in the film opening. There isn't much work left to do. I'm almost done now. Well, until next time. See ya!

Tuesday, March 21, 2023

Researching How to Make Phone Audio and Audacity

I just got the audio from my friend Sean for the phone call section. His audio was extremely clear, and I could hear every little treble and syllable very clearly in his audio. This would be great if I was just doing a voiceover of someone. The problem is that I have to make it sound like a phone call. The audio isn't very good from a phone, so I wanted to have him record clear audio so then I could edit it in a audio software and then put it into my film, so it would sound like a realistic phone call. 

I wish audio files were supported by the blogger input feature. I wanted to show you guys how clear this audio is. Let me search up how to do it. I went to the mother of all tech tutorials, YouTube (of course), and searched up how to upload an audio file into Blogger. I found a YouTube video that used the HTML feature of Blogger. I thought this was really interesting as I also like techy stuff, and I like code. I wanted to try this out. 


So basically, all I have to do to input the audio file into Blogger is to use some HTML code, which is like website code, to import the file from my Google Drive to the Blogger interface. This turned out to be really easy to do. Here's the one of the clear audio files that I got from Sean.

Now that I have my files, I can try to turn it into a phone call sounding audio. I searched up some YouTube tutorials and found this one about Audacity, an audio editing software. I have used Audacity before in one of my classes in school, specifically AICE Information Technology, but I haven't used it for really making effects to the audio before. Here's the video I found.

In the video, it changes the volume of certain frequencies, lowering the extreme ends of the frequency and increasing the middle frequencies. This looks a bit complicated, but I think it yields the best results for a phone call audio. 

Another video that I found had an extremely simple solution to the telephone effect because it literally had a preset effect to make audio sound like its from a telephone. 

It simply went to the effects panel, clicked equalize, and then finally pressed telephone as the selected curve for the audio. This seems a lot simpler, but it would be a lot less effective at making the phone quality audio. I think I might be able to use both audios tutorials to make a really good sounding audio clip. 

I will use Audacity to change the audio, but I think that's it for today. Well, until next time. See ya!

Resources

Friday, March 17, 2023

Doing the Rotoscope Animation

So, today I wanted to put my research to use and edit the clip of me in the "hospital" with my eyes messed up with a scribble effect. If I used no scribble effect, there would be nothing to imply that there is something wrong, since I would just be in a bed with the hospital monitor. If I put a scribble effect over my eyes, then it will be clear that something is wrong with my brain or my eyes, which is exactly the kind of effect I'm going for. 

I started off by creating a new Premiere Pro file so that if something went wrong, my entire file opening wouldn't get corrupted. Then, I opened the file with the After Effects Composition. This would be a new process since I have never even tried animating at all in my life. But hopefully, nothing would go wrong, and I would be able to finish relatively quickly to my other editing day, since I still have lots more work to do. I am going to go on a cruise during the break, so I have to get a lot of work done now, so I can relax later. Anyways, I pulled up the file in After Effects, and this is what it looked like.


Hmm. This software looks really familiar. It looks just like Premiere Pro. Maybe this won't be too bad. Let's get started. I looked at the tutorials again that I researched in the previous blog, and I selected the Brush Tool. I started going frame by frame and drawing a scribble over my eyes when my eyes were opened. I did not animate the parts where my eyes were closed so the audience can further infer that the thing that is wrong is my eyes, since I wanted to make the character blind. For the rest of the movie, the character will be on his struggle to figure out his athletic life and his personal life with his new disability.

There were 24 frames per second, and there were around 5 seconds to edit. This created a lot of frames for me to edit. After a while of editing, I finally finished the scribble effects on my eyes. This made me really happy because nothing had crashed or corrupted itself, and I didn't somehow manage to delete my file. This was a good sign. I went back to Premiere Pro to see how the file looked, and I was devastated. The screen was grey. 


As you can see in the image above, the preview panel in the top right is greyed out. I tried to render the file to see if it was just my computer being slow, but it stayed grey. I thought then this may be a problem with my After Effects file, since I was and am still new to After Effects. I went to After Effects and looked at everything carefully. In the top panel, I clicked on the Composition, changing from the Layer that I had been working on. This showed me the greyed out screen as was in the Premiere Pro file. This can be seen in the image below.

I then looked at the bottom left panel where I saw a "Dark Gray Solid 1" Layer on top of the video file that I had been editing. When did that get there? During my editing I somehow created a "Dark Gray Solid" and didn't notice it. I then turned the visibility box to off. I thought this would remove the grey color over my video.

I went back to Premiere Pro, and the file was all good. Phew. That's a relief. I don't have to redo all of the frame by frame rotoscoping all over again. Now, I can just render the file and export it as a .mp4 to input it into my film opening. 


I exported the file as a .mp4 file and saved it to my footage folder on my computer. Now, this rotoscoping animation was finished. After Effects is a cool software, but I really think I need a better computer if I were to continue using this software. My computer can somewhat run Premiere Pro, and with Premiere Pro and After Effects running at the same time, it just slows my computer to oblivion. So, this process was fun with the animating, but it took a while due to the slow and tedious nature of this process. Anyways, here's my finished clip and what it looks like.


You'll notice that I've not only added the scribble animation, but I also added, what I like to call, a spark animation. The scribble kind of make a spark, and it fades out. I thought this was a lot cooler, and it added more depth. I can now input this file into my film opening, and I can finish editing my video to have it completely done. Well, until next time. See ya!

Wednesday, March 15, 2023

Researching How To Do Rotoscoping Animation

Ok, lets not get confused with the term rotoscoping again. Rotoscoping is the process where an animator goes frame by frame over a video and traced certain aspects or draws something in the video. Now that I know this due to my misconceptions earlier in the project, I can actually do it. I wanted to create a nice rotoscoping effect at the end of the project to make the audience understand that the character was blind. If the viewer watches the opening and just sees the character in a hospital bed, they wouldn't really understand what the injury was. But, if I could do some rotoscoping on the eyes of the character to show a scribble effect, then the viewer could infer that the character is now blind or mentally ill. This is what I am going for. But before I can actually do this, I need to research how to do it. I haven't really used Adobe After Effects, so I need to watch some tutorials and do some research on how to do this before I can continue.

My inspiration for this scene was something that you may not really expect. I enjoy listening to lots of music and sometimes I watch the music videos. When I stumbled upon Bruno Mars' "That's What I Like." I watched the music video and noticed an animation technique that I thought was really cool. I had to have listened to the song at least 10 times. Then, I thought, "Hey, I'm in an AICE Media class. I can try that technique out in a project." This led me to where I am right now. I just thought that the animation made Bruno Mars so much cooler. 

After watching this video I wanted to understand how this animation was created so I went to YouTube and searched up how the song's animation was created. I found a video that shows the same process used in the creation of Bruno Mars' song, so I watched it and tried to understand and memorize the steps to create the animations.


I'm going to have to install After Effects onto my computer and then upload the clip of the hospital close up into the After Effects software. Then, I can create some drawings on each frame of the video. This may take a while because every single frame needs to be animated. However, I am only doing a simple animation and there aren't too many frames to edit. This doesn't look to hard, but I have only ever used After Effects a single time. I just remembered this. I was trying to edit out my hand frame by frame, and after around 3 hours of suffering, the file corrupted itself. I just deleted After Effects because it was so frustrating. In hindsight, this was a laughable moment. Anyways, I continued to do research on rotoscoping.

I looked at more tutorials on YouTube to make sure the information on this video was correct based off of other sources. I found a video using the same technique as the video I previously showed, but it was about animating a clip of Mbappe, a famous soccer player. It looks like the animation took a really long time. 

Although the process used in this video was animating the entire shot, the same animation technique can be used for just a scribble effect, and it won't take as long as the person in this video took because he must have taken so long. He sped up many different clips of himself editing every single frame with all of the colors. I only need one color, so the process will be much faster. 

I also watched another video from the same creator animating a different clip of another soccer player using this rotoscoping animation technique.

Now that I know how to do this, I can apply this to my video to the last shot of my film opening. I can add the scribble effect to when I open my eyes. As soon as I open my eyes, I can put the scribble effect to make my eyes have something wrong with them. I probably could've just used some first-aid gauze to go around my eyes, but I wanted to implement some new editing because of my inspiration from Bruno Mars. I also feel like it could be cooler and more unique as in the rest of the film, there could be an animated friend that helps the character move around, but this would end up just being his own thoughts. Well, until next time. See ya!

Resources

Monday, March 13, 2023

Researching for Title Screen Fonts

Today, I wanted to figure out what my title screen would look like. I can't just insert an Arial font title screen and call it a day. It has to match with the genre's conventions, and it has to give more meaning to the film. This is why I wanted to spend today to research for some film examples and some sample film titles to choose the right style of title. I also wanted to research fonts for this title as well.

First, I went to look at some film examples to find some sample film titles. I found one from a famous sports drama movie called Raging Bull. This movie opening included a lonely man in the boxing ring who looks angry, while many people are watching him. It's like he's boxed in a cage like the title implies with Raging Bull

Snippet from the film Raging Bull taken from YouTube (link here) (I do not own this image)

This film used a more bold title and put it in the top right corner in line with the character's eye level. This bold red font could be something that I use, but I will have to have a black background because I want to show that the character has been knocked out, and I want to show that the location has changed.

A font that looked more like the one that I would like is seen in Goal The Dream Begins, a sports movie from 2005. This film starts out with a little boy playing soccer as the title screen appears. 

Snippet from the film Goal The Dream Begins taken from YouTube (link here) (I do not own this image)

This font is more of a bold white font, which is the one that I was thinking I would use. 

Another example of the bold white title screen on a more black background was the film called Grand Prix from 1966. The film starts out with a sequence of car racers getting ready to start. This is getting closer to what I was thinking about, since it has a black all capital font, and it has somewhat of a black background.

Snippet from the film Grand Prix taken from YouTube (link here) (I do not own this image)

Now that I have an idea of what the film's font can look like, I can research specific font styles that I can put into the film opening.

It's now time for me to look online for some sample fonts. I looked on multiple websites about the fonts of films, but many of these fonts were available to purchase for money, and they weren't free to use. This made it so that I couldn't use these as I don't have a big budget for this film opening. I kept looking for some free film title fonts. I found a website with many different sports film fonts (Link Here). I looked on this website for bold fonts that I could put on a black background. I found a font that resembled the curves of a running track, and I though that this was perfect. It was called "Dragraces Demo."

The letters C, B and R looked like they mimicked the curvature of a running track.  

I found another good bold font called "Reisenberg 2.0 Regular." This font was much more bold and the C's still resembled a track.


I will have to debate between these two fonts because they both look viable for this film. I think that the first font looks a bit futuristic, so I may choose the second font, which is more bold.

Many iconic film titles have some coloration to them. For example, Star Wars is a yellow outlined font. Jurassic Park has a white bold font that is offset by small red lines in the center of the white bold text. Although these aren't a part of my genre, this statement can still hold true due to the fact that Raging Bull, the most popular sports film that I have included an image of, has bold red text.

What I was thinking to create a little bit of color was that I could take one of the C's and make it look like a running track. I could edit it in Photoshop and then just insert it into the Premiere Pro project. For example, I could just create an image of a track using many different ovals, and then I could just cut out the C portion of the track and input it into the title screen. Here's an example of what it would look like:

Image of a track. (Not my image)

I got this image from this website. It is not my image, like I said in the caption. This is just an example of what the C would look like. Just imagine this image but without the grass in the middle. That's what it would look like.

Resources

Sunday, March 12, 2023

Day 1 of Editing

Now that I have all my footage, I can finally start editing. I started editing this morning, and it has taken a while to get the clips together. But before I could start editing, I had to find a song that I liked and thought would fit the video well. 

I wanted to choose something that was an instrumental to make sure there weren't any lyrics to distract the audience. I also didn't want to use any copyright music, since there wouldn't be much time to contact any music publishers to get the rights to use that music. So, I went on YouTube and searched up "instrumental music copyright free." I found a playlist of around 400 songs that were all copyright free and royalty free. This would ensure that I wouldn't be using any copyright music. Then, I spent around 1.5 hours just searching for the right song. There were many songs that completely didn't fit the genre. Such song types included EDM, rock, opera, acoustic, etc. I was looking for more of an upbeat song to introduce the character and would make the film seem more fun during the biking segments. I also wanted a song that would be good to edit to, so I could cut the music whenever a there was a bass drum hit. After searching I finally found a song that I thought was good.

This music is definitely not mine or made by me. It is made by Jaokim Karud, and it was posted on the RFM - Royalty Free Music [No Copyright Music] channel on YouTube. As done in prior research in my research blog about the sample film openings, these kinds of movies tend to have more uplifting and intense music. They also tend to have some rap music in them as well. So, I chose a song that wasn't too far off from that type of song. To download the song I used a YouTube to MP3 converter. The link is right here -> (YT to MP3 Converter).

With the song chosen, I could now edit the film to my song. It was at this moment, with this thought, that I would not even realize what frustration laid ahead of me. One of the biggest problems when editing was inputting the song file into Premiere Pro. I'm certified in Premiere Pro, so this shouldn't be a problem, right? I can put a file into Premiere Pro without a problem, right? Nope. This most infuriating and problematic obstacle that I faced during this time editing. Whenever I imported the .mp3 file for my song, the file would open into Premiere Pro, but there would be no sound. It would just fizzle out in the beginning and then play no sound. 


In the image above, you can see the green sound file on the track. As you can see, there is no sound compared to the blue sound track for one of my clips. This was the problem. At first, I just created a new project file, since I could always just restart as I haven't really made much progress yet. After creating a new project file and inputting the sound clip in, it still wasn't working. Then, I thought that the file that I was inputting was the problem. I opened the file on my windows explorer, and it was working. This made me really confused. I then tried redownloading the file from the YT to MP3 converter as an MP4 file. I thought I could just take the audio from the MP4 file. This turned out as a failure because after multiple attempts to download it on multiple different browsers such as Google Chrome, Opera GX, and Firefox, the MP4 file wouldn't download. Hmm. "Not to worry!" I thought. "Let me just restart my computer." After restarting my computer, I opened the Premiere Pro software again and then tried to input the MP3 file again, but it still wouldn't work. AGHH! How am I going to get any editing done if I can't even input the song? I looked onto Google to find my answer of how to input the file into Premiere Pro. After searching for a solid 20 minutes on YouTube tutorials and Reddit posts, I found an Adobe Support post by "dwrichy," and he had the same problem as me. 


One of the post's comments had a solution to my problem. His name was Warren Heaton, and he said that dwrichy should change the file format from .mp3 to .wav. 


At this point, I was desperate for a solution to my problem. So, I decided to try this out. After converting my .mp3 file to .wav using a MP3 to WAV converter (link right here: MP3 to WAV converter), I tried to input it into my project. I was really hoping that this would work because if it didn't, I wouldn't know what to do. But, thankfully, it worked. YES! I was so happy. Now, I could finally start editing.

Since I already had all my files in my Google Drive folder, all I had to do was download the files onto my computer for my use. It only took around 10 minutes to download, but it was a hefty download sitting at around 1.5 GB.

With the files downloaded, I could just put all of the files into Premiere Pro, and edit it to the music to make it much more cohesive. I put all of the shots that I needed up until when the character left the house. I was surprised to see that the film was already a minute long. I realized that I had way too many shots and way too much storyline to show in just two minutes. 

Just look at how many different shots I had in my footage folder. If I did the math right, there are 81 different shots. If each shot was one or two seconds, this would be fine. But the dialogue take a long time, so I would have to exclude many shots. I deemed that the medals, the phone call, and leaving the house were all necessary to the film. I had to cut a lot of the biking to the bike park. Then, I had to keep the dialogue of the main character meeting his friend and them biking around in the trails. The part that I completely cut out was the next dialogue where they had finished a round of the bike park, and the main character wants to go for more. I was sad to cut this part because I really wanted to show the over-confidence of the main character in the beginning of the film so that he would have to be humbled by his injury. Oh well. There just isn't enough time. Here's what it looked like when I finished editing for today:

As you can see, there are a lot of cuts and many shots included in the film. There was a lot of editing techniques that I implemented today. I used crossfades in the beginning when showing the achievements of the main character. I then used lots of stylized jump cuts of the main character leaving the house to show make the film more engaging and cohesive with the music. I also used lots of cutting whenever the snare hit or the bass drum hit. This made it feel more lively. I also edited the audio to be quiet whenever there was dialogue going on and louder whenever the character was not saying anything or during the biking scenes.

After all of my hard work today, I think it paid off. Most of the editing is now done. All I have to do is wait for my friend Sean to send his voiceover lines for when he is talking on the phone. I can edit the audio to make it more muffled like how a phone call would actually be. I also have to figure out what I should do for the title, and I have to edit the last clip of the film to have scribbles over his eyes to indicate that there is something wrong with them. I can leave the audience guessing for what happened to his eyes, although many people will guess correctly. He will be blind. Finally, I just have to add a couple more clips to the project to make the biking sequence more developed. I think I did a lot of good work today. Hopefully you think so too. Well, until next time. See ya!

Saturday, March 11, 2023

Filming Day 2

Yesterday was my second day of filming. I couldn't do a blog yesterday because I was busy doing some other work and going outside with friends as it was a Friday night. Anyways, I'll tell you about it now. Yesterday, was my second and last day of filming. I recorded all of the shots that needed to. I got all of the shots ranging from the very beginning of my film with the pan of the medals to the main character leaving the house. I also got the shot of the main character in the "hospital." Let me tell you about how I did this. 

First of all, I needed to get the tripod to make these shots stable. Yesterday during school, I went to my teacher's classroom to ask her for a tripod. She kindly gave me a tripod and sent me on my way. After school, I immediately set up the tripod to get started with filming. 

Afterwards, I got ready to film. I wanted to film the shots of the medals first. I put my phone on the tripod and set up the camera right in front of my medals. 

All of the medals shown in the image above were actually all medals that I've been awarded after my races. After I got these shots, I went to get some more shots of my dad's medals since there were a lot more of those. These shots were easy to take because they didn't need any help to take, since only the cameraman (AKA me) is needed to take these shots. With the next shots, I only had help by my brother for two out of probably 20 shots. This made the process a lot harder since I couldn't just have someone start the button on the camera for me. I had to press the button, get into the shot, do the action, get out of the shot, and then stop the camera. This caused the process to take much longer than I thought it would. However, it was okay since I was able to finish in around 90 minutes. 

Finally, I had to take the shot of me in the hospital. For this shot, I wanted my face to be dirty and covered in dried up blood. However, I didn't actually want to cut myself to get some blood. Ew, of course not. What I ended up doing was getting some dirt from my backyard, make it wet with some water, and smear it on my face. I waited for this to dry and this made my face look really dirty, since I had just "crashed" in the prior scene. Then, I took some ketchup and also smeared that onto my face giving the dirt a more crimson color. This made it look like I had got scratched up and all dirty. Here's how it looked. 

After this shot, I was officially done with filming. Wait a minute. It feels like I forgot something. Yes. The green screen shot. Well, no, I actually didn't forget. I have decided that the green screen shot actually wouldn't be possible with my set up since I would have to have something lift up the bike in order for the wheels to be spinning. If I just was on my bike in front of the green screen, then the wheels wouldn't be spinning and I wouldn't be able to get a good shot. This would be a continuity error. Therefore, I decided to scrap the shot and just use the POV shot, since it looked pretty good. In order to have the wheels spinning I would have to have something lift up the bike, but that would defeat the purpose of the green screen. I tried to look up how else to do this by editing, and it would be too complex to edit out the spokes of the bike, since I would have to edit every frame. 

At least I have finished with the filming. Tomorrow, I will try to do most of the editing since during spring break, I will be going on a cruise and won't be able to work on the assignment. Well, until next time. See ya!

Thursday, March 9, 2023

Saving My Footage

In class, I have heard my teacher tell stories of students of previous years have all their footage taken, but then have it all deleted. This caused the students to have to rush filming again and getting a worse grade. I did not want this to happen to me. I wanted to create a place other than my phone or flash drive where I could save all my footage onto. I needed a storage area where I could put the footage from my phone, from Sean's phone, and the GoPro all into one place where I could easily access it for when I wanted to edit. This is where Google Drive came in. 

Sean created a Google Drive folder where he put all of the shots that he got from his phone onto. I then transferred all of my phones shots into the Google Drive folder as well. This will ensure that I have multiple places that have the saved footage, meaning there is almost no possible way that I could lose my footage. Google Drive also has a feature that makes accessing the files and certain shot that I want easier. The image below shows that the files can be viewed in such a way that only shows the name of the file and it's information. I can't see what the file entails unless I open it up. This would make the editing process much harder as I would not be able to see each type of shot. 


However, I can switch the format of Google Drive to make each file look like an image. This will help me so much when I go to edit because I will be able to see each shot easily. This will prevent me from having to open every single file to search for the shot that I want to put into the film opening. There are already over 65 files, and I'm not even done filming yet. 


I still have to ask my teacher for a tri-pod and film the shot that are inside my house. I also have to film before the sun sets, preferably at 4:00 PM, and I also have to film after the sun sets so probably around 7:00 PM. The reason I want to film at two different times is because I need to get the footage for the scenes before biking to the park, which should have more natural light as it will be before those scenes. I also need to have a shot of me in the "hospital." This will be way after I crash, so it would only make sense if I make this scene late at night, AKA when the sun goes down and it gets dark. I cannot film today since I have a dentist appointment right after schools, and I have a track practice right after my dentist appointment. So I will finish filming tomorrow. When I finish filming tomorrow, I will be able to edit over the weekend and hopefully finish the film opening. I will still need to make some revisions to the video and ask a couple of peers about what they think. I also need to think about the music in the film and the font of the title. There's also the topic of Foley sound. There's still so much to do, but I'll find a way to get it done. I'm still technically on schedule. Well, until next time. See ya!

Sunday, March 5, 2023

Revision of Shots List and Filming

Revision of Shots List

Yesterday, before I went to film, I wanted to add a couple of shots to make the dialogue make more sense. I also wanted to add another aspect to the main character's personality. The main character is a track star, with lots of medals and awards. So at the beginning of the film, he is a bit hesitant to go through with the mountain biking as he knows of the danger. But as he becomes used to the trails, he becomes more cocky. After they get finished with one round of the park, Kiran will ask his friend, Sean, to go for one more round. This overconfidence will end up getting injured, ending his fantastic career. So I added more dialogue to incorporate these aspects into my film. Let me show you my revised shots list.


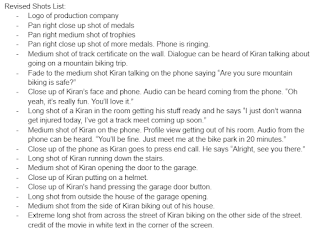
All of the yellow highlighted parts are the new shots that I added yesterday prior to filming. All of the red highlighted parts are shots that I wanted to remove because I thought they were somewhat irrelevant to the story. In the beginning of the storyline, you can see Kiran getting influenced by the peer pressure from Sean, but later you can see Kiran's cockiness shine since he is overconfident as he thinks he is the best in many things. With the shots list complete, I could now go film. 

Filming

Well, I went filming yesterday at 4:00 PM with Sean and my brother, Ryan. First, Ryan and I filmed the shots of me leaving my garage. He captured the shots of me leaving my house. I met up with my friend Sean on the way to the mountain biking park. When we had gotten to the mountain biking park we took a shot of me riding into the park with a pan left onto the sign of "Markham Park." I really liked this shot. 


Shot of Markham Park sign (left), BTS of this shot (right)

The filming was smooth sailing until we actually got into the bike park. We had quite a few problems and obstacles that we had to face. 

One of the biggest problems that I had faced during the filming was the time restraints I had went to film right before the golden hour of sunset, since I had arrived at the bike park at 4:30 (I had to bike there). I needed to make sure that I could film all the shots before the sun set. If the sun set, then there would be a ton of continuity errors, which would make the film unwatchable. I had around 90 minutes to film all my shots in the trails, which would be good if we worked fast. 

OTS shot of dialogue

As you can see in the image above, the sun seems like it's setting due to the lighting on Sean's face. This meant that we needed to speed up the filming of our video before the sun set. However, this shot was taken near the end of our filming, so we had plenty of time to finish. We were able to finish with around 20 minutes before the sun set, which meant that we were all good.

Another big problem I faced was that if I wanted to use the GoPro in a shot, I would have to put it on and take it off for every shot since I would have to take it off to maintain continuity. I can't just have a GoPro strap randomly appear on me in the film. 

Sean helping me put on the GoPro strap (left), Me putting on camera (right)

The thing is, it would take a really long time to keep putting on the GoPro strap and taking it off each time I wanted a POV shot or a still shot. To solve this problem, we did two rounds in the trails. The first round would be with only the GoPro. Then, I would take the GoPro off and do a second round in the park with shots from my phone. This would allow me to only put on the GoPro one time and take it off one time. Furthermore, it was my first time using the GoPro. The GoPro model was the GoPro HERO9 Black. I had trouble starting the device to film because I kept tapping on the screen and that would send it to settings, pausing the recording. I needed to be really careful in starting the camera. Also, there was a problem with my SD card. At first, the GoPro said that the SD card was incompatible and we would need to format it for it to work. We restarted the GoPro, hoping that this would work, otherwise we wouldn't have any POV shots. Fortunately, the GoPro was now working and the SD card was formatted. I'm happy that we were able to use the GoPro because it gave us some nice shots like the one below.

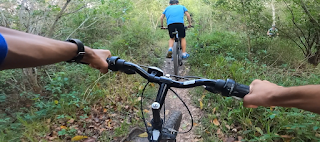
POV shot from GoPro footage.

I couldn't really use a tripod due to the unstable ground in the biking trails, so I used the stabilize footage setting on my phone. This worked pretty well considering that I have a budget phone. Even if I had a tripod, it would've taken much longer to actually film the shots since we would have to set up the tripod every single time we wanted to take a shot. This would've caused us to not finish filming. One other problem I faced was that I was filming the still shots with my phone, but my phone was about to die, even though I had charged it fully right before I left. This problem was easily solved by just asking Sean for his phone so we could film. 

We were able to overcome all of these obstacles in our filming process to get all of the footage we wanted for today. The footage we got today were the shots from when the character left his house from his garage to the bike crash. I was able to get lots of extra footage so that I can choose what I want to include into my film opening. I have lots of footage of biking in the trails and many different and professional looking shots. I would describe yesterday as a success. 

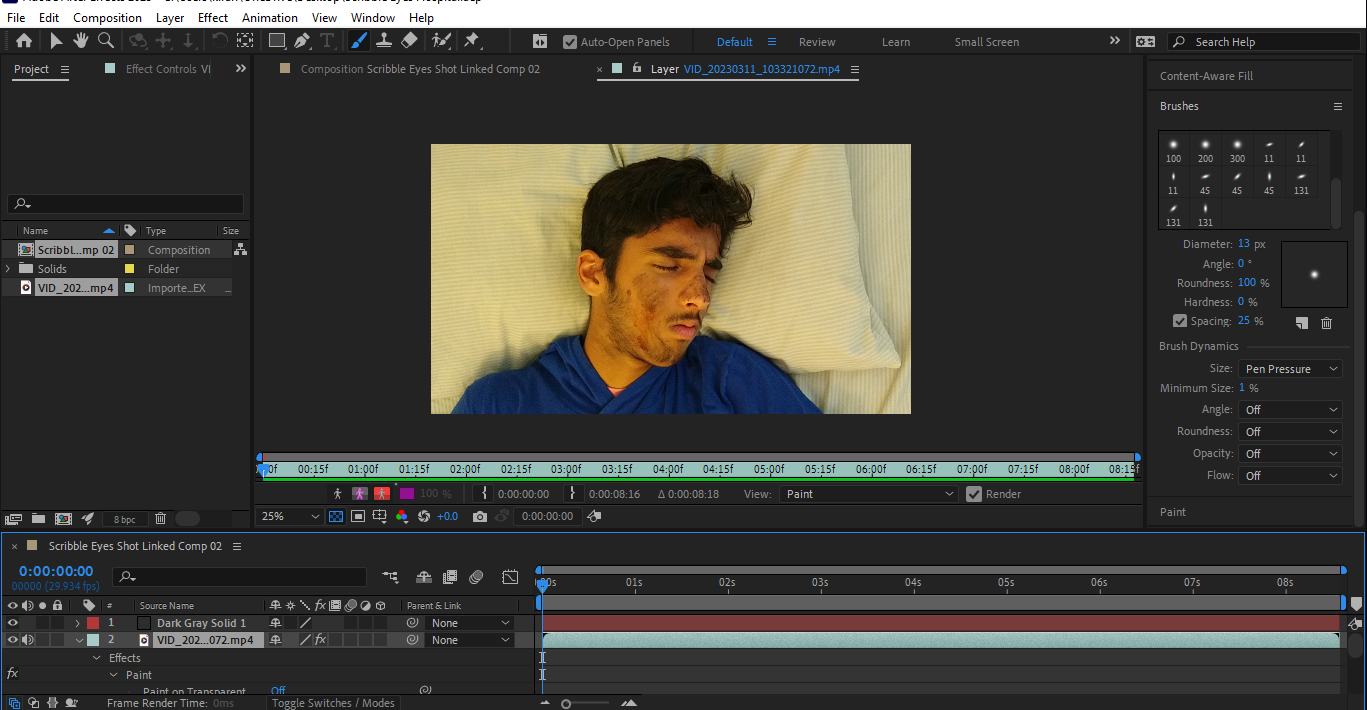
So overall, the filming process was a little bit stressful, but we were able to complete all of the outdoor shots. All I need to film now is the shots of my medals and trophies, the shots of me getting to my garage, and the close up shot of me in the "hospital," AKA my bed. I think I will most likely do this tomorrow if I don't have anything going on after school. I also need the green screen shot, which I will ask my other friend for his green screen for. I also would like to get a tripod from my teacher to do these shots since these shots have to be stable. Well, until next time. See ya!

Creative Critical Reflection

Well guys. This is it. This is the end of the road: my CCRs. I really would like to thank you for taking the time to read all of these blogs...